


Turn a Hot Wheels Car Into a Life-Sized Supercar With AI
ON THIS PAGE
Subscribe To Get Weekly Family AI Discoveries

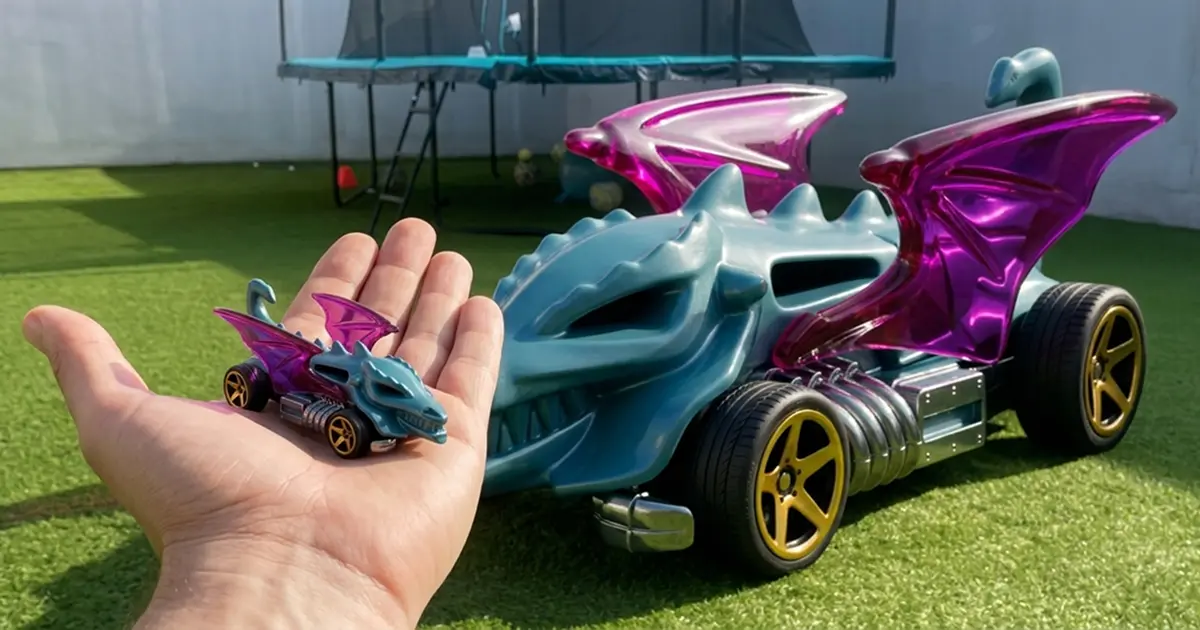
The Dragon Blaster is a Hot Wheels car. Teal body, violet wings, gold rims. My 4-year-old Conor carries it everywhere.
The goal: put that toy on the grass and watch it transform into a full-sized supercar. The plan was to film Conor dropping it, then cut to a life-sized version sitting in the same spot.
The first version came out well technically. Stable background, correct scale, photorealistic lighting. Conor watched it and cried. He wasn't in it. He was watching a car transform. He wanted to be the one who made it happen.
We rebuilt the sequence around him. He throws the car. The camera follows it to the grass. The transformation begins. Twenty minutes of total work across three tools: Nano Banana 2 for the end frame, Kling 3.0 for the animation, Gemini for troubleshooting the lighting and scale.
This guide covers the exact prompts, the two technical fixes that matter most, and the one pivot that turned a technically correct video into something a 4-year-old watched on loop.
Quick overview
- Time: 20 minutes
- Cost: Nano Banana 2 free via Gemini app (20 images per day), Kling 3.0 requires paid credits, ChatGPT Images 2.0 free tier available as alternative
- Difficulty: Intermediate
- Age range: All ages (parent does the technical work, child provides the footage)
- Key learning: The bookend technique — give the AI the final frame so it knows exactly what to build toward
- What you'll create: A short video of your child's toy growing to full size in your garden
What you'll need
Tools:
- Nano Banana 2 — free via the Gemini app (20 images per day on a standard Google account). Used to generate the life-sized end frame.
- Kling 3.0 — paid credits required. Used to animate the transformation between the toy footage and the end frame.
- ChatGPT Images 2.0 — free tier available. Alternative to Nano Banana 2 for end frame generation if you hit the daily limit.
- Gemini — free. Useful for troubleshooting lighting and scale problems if the first attempt doesn't look right.
Your child's input:
- 5-10 seconds of video: your child throwing or placing the toy on the grass
- Their favourite toy — something with distinctive colours or features that survive the transformation
Parent skills:
- Basic prompt writing (copy the prompts below and adapt)
- A clear garden photo to use as the background plate
Optional:
- A second device to show the result to your child immediately after rendering
Not sure which tool is right for your child?
Take our free 2-minute quiz and get personalized AI tool recommendations based on your child's age and interests.
Step-by-step process
This project runs in three phases: generate the end frame, film your child, animate the gap between them. The order matters. Generate the end frame before filming so you know exactly what final result you're building toward.
Step 1: Photograph your background plate
Go outside and photograph the exact spot where the transformation will happen. This image becomes your background plate for the AI generation step.
What works: Get low. A 3/4 POV from knee height gives the most natural perspective for a car sitting on grass. The camera angle in the background photo needs to match the angle in your child's video.
What to avoid: Top-down shots. The AI struggles to place a car convincingly when the camera is looking straight down at the ground.
💡 Parent Insight: Take the photo on an overcast day if possible. Soft, diffused light is easier to match in the AI-generated image than harsh directional sun. It also means fewer lighting fixes in Step 3.
Step 2: Generate the life-sized end frame
Upload your garden photo to Nano Banana 2 (via the Gemini app) or ChatGPT Images 2.0. This step generates the final image — the full-sized car sitting in your garden as if it is actually there. This is the bookend that Kling will build toward in Step 5.
The prompt that worked:
Perspective Composite: Use the uploaded garden image as a strict background plate. Introduce a life-sized, monstrous supercar modeled precisely on the Dragon Blaster Hot Wheels car. Orientation: Front 3/4 POV facing forward. Details: Metallic teal-cyan body, translucent violet wings, gold-rimmed wheels. Lighting: Apply bright, high-key, diffused overcast daylight to match the garden. Cast a soft, natural ambient occlusion shadow on the turf. 8K texture, photorealistic.
Result: A photorealistic image of the full-sized Dragon Blaster in the garden. The shadow on the grass is what makes it convincing.
💡 Parent Insight: Describe your toy's specific colours in the prompt. "Metallic teal-cyan body, translucent violet wings, gold-rimmed wheels" kept the Dragon Blaster recognisable through the whole transition. Generic prompts like "red race car" produce something that bears no resemblance to the original toy.
Step 3: Check the lighting and fix it if needed
Compare your generated end frame to your garden photo. Check two things: the direction of the light and the colour temperature.
The first version of the Dragon Blaster came out with golden hour lighting — warm, directional, dramatic. The garden photo was overcast and cool-toned. The car looked like a sticker placed on top of the image.
If the lighting is wrong, add a conform instruction to your prompt and regenerate:
Lighting: Apply cool-toned, diffused overcast daylight. No warm highlights. Match the ambient occlusion of the background photo exactly.
This is the single most important quality check before moving to animation. A lighting mismatch in the end frame cannot be fixed in Kling.
Step 4: Film your child
Film 5-10 seconds of your child throwing the toy onto the grass. This becomes Frame 1 for Kling.
Two options for how to frame the shot:
- Third-person shot: Camera stays fixed, child is visible throwing the car. Easier to film, but the child is a spectator in the result.
- First-person POV: Camera held at chest height, angled down. The viewer sees the throw from the child's perspective. The child becomes the catalyst.
The first version used a third-person shot. Conor watched it and cried because he wasn't part of what was happening on screen. The POV version, where he throws the car and the camera follows it to the grass, made him feel like he triggered the transformation himself.
💡 Parent Insight: For children under 5, the first-person POV version lands completely differently. They watch themselves cause something impossible to happen. Film both angles if you have time. The POV edit is always the keeper.
Step 5: Animate in Kling 3.0
Upload Frame 1 (the toy-throw video clip) and Frame 2 (the life-sized end frame) to Kling 3.0. This is where the transformation happens.
Two prompts tested. Use whichever produces the cleaner result:
Simple version (often works best):
The boy throws the hot wheels car on the grass and it grows to be a full size car.
Mechanical version:
The hot wheels toy car in the first frame is thrown on the grass and then it mechanically builds into a full size version in the last frame.
Result: A smooth morphing transition from toy to full-sized car. The background stays stable because you've given Kling both endpoints. It doesn't have to guess where the animation is going.
💡 Parent Insight: Kling 3.0 handles plain language better than technical descriptions. "It grows to be full size" works because the model already understands physical growth. Adding technical jargon confused it and caused background flicker. Start simple, add detail only if the first attempt produces something unrecognisable.
Step 6: Review and show your child immediately
Watch the result before showing your child. Check three things: does the car stay recognisable through the transition, is the background stable, does the shadow appear on the grass at the end.
If all three are yes, show your child straight away. The reaction within the first 30 seconds of seeing it is the whole point of the project. Don't let it sit in drafts.
What worked
The bookend technique
Providing Kling with an end frame — the photorealistic image of the life-sized car in the garden — was the decision that made the whole project work. Without it, the animation drifts. The toy morphs into a generic shape that vaguely resembles a car. With the end frame, Kling has a target. The Dragon Blaster stayed on-model through every frame of the transition.
Lesson: Always generate the end frame first. Animate second.
The child-as-catalyst framing
Switching from a static shot of the toy to a POV clip of Conor throwing the car changed how he experienced the result. He wasn't watching a special effect. He was watching himself do something impossible. That difference matters more than any technical quality improvement.
Lesson: For young children, being in the footage and appearing to cause the transformation is more important than technical quality in the output.
The grass shadow
Specifying "Cast a soft, natural ambient occlusion shadow on the turf" in the image generation prompt produced the detail that made the car look grounded. Without a shadow, the car floats. With it, it looks parked.
Lesson: Include shadow instructions in every image generation prompt for outdoor scenes.
What didn't work
Animating without an end frame
The first animation attempt used the POV clip as Frame 1 but no end frame. Kling generated a transition but the car that appeared bore no resemblance to the Dragon Blaster. Wrong colour, wrong shape, no wings.
Time wasted: One full render cycle
Lesson: Frame 2 is not optional. Generate it before you start animating.
The third-person static shot
The first version was technically clean. Correct car, correct lighting, stable background. Conor watched it and cried. He couldn't see himself in it. The transformation was happening to the car, not because of him.
Time wasted: One full workflow cycle
Lesson: Test the child's response before calling a version finished. A technically perfect result that leaves the child feeling like a bystander is not a finished project.
Complex prompts in Kling
Adding technical language to the Kling prompt produced a result where the car morphed correctly but the background flickered. The model was trying to do too much at once.
Time wasted: One render cycle
Lesson: Use plain language in Kling. Describe the action, not the mechanics.
Getting the most out of this workflow
Before you start:
- Pick a toy with distinctive colours and features. Generic-looking toys produce generic-looking transformations.
- Photograph the background on an overcast day. Soft, diffused lighting is easier to match in the AI-generated image.
- Get the camera low — knee height or lower — for the background plate photo and the child's video.
During the process:
- Generate 2-3 end frames before animating. Pick the one with the best shadow and lighting match. Don't animate from the first image you generate.
- Try both Kling prompts (simple and mechanical). Run them in parallel if credits allow. One usually produces a cleaner result than the other with no way to predict which.
- Check the lighting conform before you animate. A lighting mismatch in the end frame cannot be fixed later.
What I'd do differently:
- Film the child's throw from two angles. The POV version won, but having a third-person backup would have saved one render cycle.
- Have a second device ready to show the result immediately. The reaction in the first 30 seconds of seeing it is the whole point.
Tool comparison
Nano Banana 2 (free via Gemini app)
- Pros: Free at 20 images per day, strong at photorealistic compositing with a reference background photo
- Cons: 20-image daily limit, occasional lighting inconsistencies on first pass
- Best for: Generating the life-sized end frame
ChatGPT Images 2.0 (free tier available)
- Pros: Strong instruction-following, good at placing objects in a reference image
- Cons: Slightly less photorealistic than Nano Banana 2 on outdoor scenes in our testing
- Best for: Alternative end frame generation when Nano Banana's daily limit is reached
Kling 3.0 (paid credits)
- Pros: Best-in-class at stable background preservation during large-scale transitions. Handled a 50x scale-up without warping the trampoline, soccer balls, or garden furniture in the background.
- Cons: Paid credits required, complex prompts can cause background flicker
- Best for: Animating the transformation between Frame 1 and Frame 2
Common issues and solutions
Problem: The car doesn't look like the original toy
Include the toy's specific colours, features, and distinctive details in the image generation prompt. Describe it as if explaining to someone who has never seen it. "Metallic teal-cyan body, translucent violet wings, gold-rimmed wheels" is specific enough. "A Hot Wheels car" is not.
Problem: The car looks like it's floating on the grass
Add "Cast a soft, natural ambient occlusion shadow on the turf" to your image generation prompt and regenerate the end frame. A matching shadow is what grounds the car in the scene.
Problem: The lighting on the car doesn't match the garden
Add a lighting conform instruction to your prompt: "Lighting: Match the cool-toned, diffused overcast daylight of the background photo exactly. No warm highlights. No directional sun." Regenerate until the car's light matches the scene. Do this before animating.
Problem: The background warps during the Kling animation
Simplify the Kling prompt. Remove all technical language and use plain action description: "The toy car is thrown on the grass and grows to be full size." The more you describe the mechanics, the more Kling tries to animate the background. Plain language keeps it stable.
Problem: The car becomes unrecognisable mid-transition
You are missing the end frame, or the end frame doesn't clearly show the toy's original features. Regenerate the end frame with more specific colour and feature descriptions, then re-upload both frames to Kling.
Problem: The child is disappointed with the result
Check whether the child appears in the footage as an active participant. A static shot of a toy changing is a special effect. A clip of your child causing it to happen is a different experience entirely. Re-film with the child throwing the toy from a first-person POV angle.